Automatically Updating Your Website Using GitHub's Service Hooks
I've been using git and GitHub in my workflow for a while now and the only thing that has bothered me about the process is that every time I want to deploy a new version of the site I have to push it to GitHub and then SSH into the server and manually do a git pull. Needless to say it's a giant hassle.
What I really wanted was a way to just push the commits to GitHub and then have the server automatically pull the updates. Initially, I thought I would just write a crontab script that would do a pull every couple minutes but I knew there had to be a better way. It turns out with GitHub's Service Hooks we can do exactly that.
Site Set Up
The first step in this process is to setup a new repository on GitHub. I would recommend initially setting up the repository with a readme file in it so we can clone it initially.
Clone the repository to your local computer with whatever flavor of GitHub you prefer. I'm going to use the command line for these steps because then I don't have to capture screenshots. git clone git@github.com:warren5236/psychic-hipster.git
Now that we have our repository created we're going to create a public folder (this should be the document root so the .git folder isn't readable by the world) and a file inside the public folder named 'githubupdate.php' with the following contents.
<?php `git pull`;?>This is the file that's going do all the work after you push to GitHub. You can add additional logic to this that might clear your caching system or update your database.
Now add this file to the repo, commit, and push it. git add . git commit -m "Initial commit" git push
Server Setup
First create a new virtual host for our site. I created the file /etc/apache2/sites-available/psychic-hipster.thisprogrammingthing.com with the following contents.
<VirtualHost *:80>
    ServerAdmin webmaster@localhost
    ServerName psychic-hipster.thisprogrammingthing.com

    DocumentRoot /sites/www-data/psychic-hipster/public
    <Directory />
        Options FollowSymLinks
        AllowOverride All
        </Directory>
        <Directory /sites/www-data/psychic-hipster/>
        Options Indexes FollowSymLinks MultiViews
        AllowOverride All
        Order allow,deny
        allow from all
    </Directory>
</VirtualHost>
Now enable the virtual host using a2ensite a2ensite psychic-hipster.thisprogrammingthing.com
The next thing we need to do is to create an SSH key for the user that Apache is running under to use when it pulls updates. I'm using Ubuntu for this example so the username is www-data. If you aren't using Ubuntu you'll need to tweak this with the account apache is running under.
The first step is that we need to create a location for the SSH keys to exist.
sudo mkdir /var/www/.ssh
sudo chown www-data /var/www/.ssh
We also want a location that the www-data user can clone the repository to.
sudo mkdir /sites/www-data
sudo chown www-data:www-data /sites/www-data
The next step is that we need to log in as the user. Because we can't do this directly we're going to su into the user.
sudo -s su www-dataIt's finally time to create the keys for the user. When your prompted for a password just press the enter key or when git pull runs it's going to ask for a password and this won't work when we do it automatically. ssh-keygen -t rsa -C "www-data@server.com"
Next, copy the contents of the public key. cat ~/.ssh/id_rsa.pub
Add this key to your account in GitHub. This is done by clicking on your account then SSH Keys and finally the "Add SSH Key" button. After you click "Add Key" you will be prompted for your password before the key will be saved.
Your Initial Pull
Still SSHed in as the www-data user it's time to finally clone our repository. I would highly recommend you use the read-only repository for this so you don't have to worry about people messing up the production files.
git clone git@github.com:warren5236/psychic-hipster.git /sites/www-data/psychic-hipsterSetting up the Service Hook
In order to setup the service hook on GitHub click on the "Settings" link the upper right hand corner of your repository.
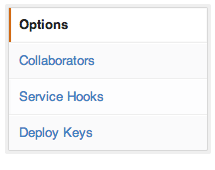
Then click "Service Hooks"
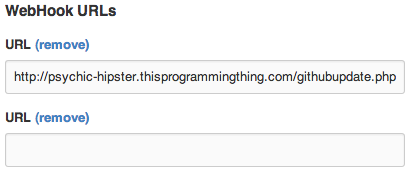
Then "WebHook URLs"
Finally, enter the full URL to the script we created earlier and then press the "Update settings" button.
Results
If you attempt to access the site now you should get something that looks like this. 
It's working but it's ultimately a little boring. However if we add a very basic index.html file and commit it to github (without doing a manual pull) we should see the results immediately.
index.html
<html>
<body>
    Success
</body>
</html>
Comment and push the file
git add .
git commit -m "Added index.html"
git push
In Closing
This process has completely changed how I will update my sites from now on and will keep me from having to keep five open SSH connections alive. After I get over the lack of control, I know it will improve my efficiency. I'll continue to tweak this process and improve on it so feel free to check back to see what else can be done.
Scott Keck-Warren
Scott is the Director of Technology at WeCare Connect where he strives to provide solutions for his customers needs. He's the father of two and can be found most weekends working on projects around the house with his loving partner.
Top Posts
- Working With Soft Deletes in Laravel (By Example)
- Fixing CMake was unable to find a build program corresponding to "Unix Makefiles"
- Upgrading to Laravel 8.x
- Get The Count of the Number of Users in an AD Group
- Multiple Vagrant VMs in One Vagrantfile
- Fixing the "this is larger than GitHub's recommended maximum file size of 50.00 MB" error
- Changing the Directory Vagrant Stores the VMs In
- Accepting Android SDK Licenses From The OSX Command Line
- Fixing the 'Target class [config] does not exist' Error
- Using Rectangle to Manage MacOS Windows


